
Install Correctly. Maintain Performance.
Step-by-step guidance for installers, facility managers, service technicians, and the architects and designers who need to understand the process.
- Home
- Installing or Maintaining
Safety first. Disconnect and lock out all electrical power before handling wiring. Air curtain units can be heavy. Use appropriate lifting equipment and at least two people for overhead mounting. Do not operate the unit without all covers and guards in place. Always follow local electrical code requirements.
Tools Required: Drill / impact driver • Level • Tape measure • Wire stripper • Voltage tester • Conduit bender (if required) • Torque driver • Lift or scaffolding for overhead work

Warranty. Failure to follow Berner installation instructions may void the product warranty. Retain a copy of the installation manual for the facility file
Pre-Install Checklist
Before beginning installation, verify the following site conditions and confirm you have the correct unit for the application. Incorrect sizing or mounting configuration will reduce performance and may void warranty.
- Inspect unit for shipping damage before beginning installation
- Confirm unit model matches the environment, and carries the correct certification (UL listed indoors/outdoors)
- Verify available voltage, phase, and amperage against unit nameplate
- Confirm overhead clearance per mounting requirements (see Mounting section)
- Locate and review the product-specific installation manual before proceeding
- Confirm all required fasteners, conduit, and wiring materials are on-site
- Identify structural support location as unit must be anchored to framing or header, not drywall alone
- Confirm correct mounting placement. If it’s backward, too high, too low, or too far away, it won’t be effective
Install with Confidence
Air curtains create an invisible barrier that separates environments while allowing people to move freely.

Before drilling, confirm the correct mounting specifications for your model.

Check your installation manual and install mounting brackets. Don’t overtighten.
Verify level before securing and double-check the torque.

Lift the air curtain onto the mounting brackets and secure.
With assistance (unit weight varies by model) lift the unit onto the mounting brackets. Secure all locking points and verify the discharge faces downward.

Connect wiring per your installation manual.
Match voltage, phase, and grounding to the nameplate. Do not power on until wiring is complete and covers are reinstalled.

Install controls and interlocks, if applicable.
Wire controls per the controls wiring diagram in your installation manual.

Restore power and commission the unit.
Complete commissioning and testing per your installation manual. Confirm door interlock function if installed. Do not skip this step.
Note: For heated units, a separate disconnect switch must be installed per NEC 440.14 within sight of the unit. Consult your local electrical inspector for jurisdiction-specific requirements.
Looking for a specific model manual?
Installation steps vary by product family. Always use the manual for your specific model available in Product Manuals & Documentation below.
Mounting, Clearance & Door Types
Correct mounting height and configuration directly determine performance. The unit must be installed with the discharge nozzle as close as possible to directly above the opening. As products are typically selected by application, different series are suitable for different door heights.
Surface Mount
Standard for commercial and industrial applications. Unit hangs below finished ceiling or header. Full range of models available. Requires overhead structural support. Transom mounted or threaded-rod suspended.Ceiling Flush Mount
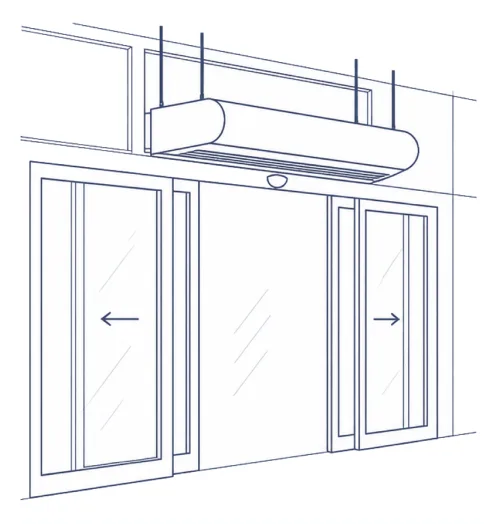
Standard for commercial and industrial applications. Unit hangs below finished ceiling or header. Full range of models available. Requires overhead structural support.Vertical / Side Mount
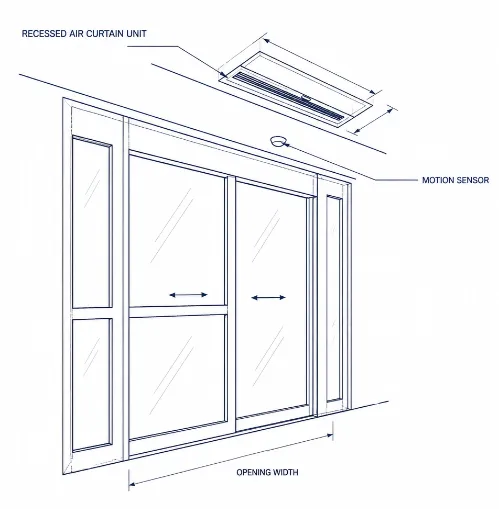
For applications with restricted overhead clearance. Unit mounts vertically to the door jamb. Performance is equivalent when properly sized. Not all models available in this configuration.Surface Mount
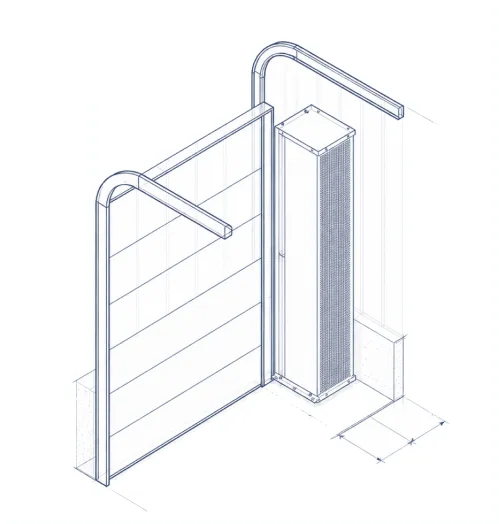
Standard for commercial and industrial applications. Unit hangs below finished ceiling or header. Full range of models available. Requires overhead structural support. Transom mounted or threaded-rod suspended.
Ceiling Flush Mount
Standard for commercial and industrial applications. Unit hangs below finished ceiling or header. Full range of models available. Requires overhead structural support.
Vertical / Side Mount
For applications with restricted overhead clearance. Unit mounts vertically to the door jamb. Performance is equivalent when properly sized. Not all models available in this configuration.
Electrical & Controls
All wiring must be performed by a licensed electrician and must comply with NEC, local electrical code, and the specific wiring diagram on the unit label. Wiring diagrams are also sent with each air curtain.
| Control Type | Wiring Input | Typical Use |
|---|---|---|
| On/Off Switch | Line voltage (120–480V) | Basic manual operation |
| Automatic Door Switch | Dry contact, 24V or 120V | Auto on when door opens |
| Thermostat | 24V control signal | Heated units (temp limiting) |
| BACnet/IP | Cat5e/Cat6 Ethernet | BAS integration & monitoring |
| BACnet MS/TP | Twisted pair (EIA-485) | BAS daisy-chain networks |
Lockout / Tagout. Always disconnect and lock out power at the disconnect before accessing the junction box or control wiring. Verify absence of voltage with a meter before touching any conductors.
Wiring Diagrams. Wiring diagrams are supplied with each unit.
Commissioning & Testing
After installation is complete and power has been restored, work through the following commissioning checklist to confirm correct operation before handing off to the facility.
- Check all fasteners and confirm unit is secure with no vibration or movement
- Verify unit powers on and fan rotates in the correct direction
- Test door interlock: open door — unit should activate; close door — unit should deactivate
- Follow the installation instructions to adjust the airflow
- Confirm the airstream is not blocked
- For heated units, verify heat is activated
- For variable speed models: confirm low and high speed operation responds to control signal
- For BACnet: confirm object discovery and status read-back from BMS
- Document model, serial number, installation date, and commissioning results for the facility file
For maximum effectiveness, the air curtain discharge width should exactly match the door opening width. If coverage gaps are visible at either edge, verify the unit model is correctly sized for the opening.
Commissioning Documentation
A commissioning record sheet for Berner installations is available in Product Manuals & Documentation. Complete and retain a copy with the facility’s maintenance records.
Common Issues & Troubleshooting
Find problems. Fix them fast.
| Symptom | Likely Cause | Resolution |
|---|---|---|
| Unit does not power on | Disconnect tripped or open; incorrect voltage at unit | Check disconnect and circuit breaker. Verify incoming voltage matches nameplate. |
| Fan runs but no airflow at door level | Fan rotating in reverse direction; discharge blocked | Swap any two line-voltage leads to reverse rotation (3-phase only). Confirm no obstructions in discharge path. |
| Heated unit blows cold air | Heating element not energized; thermal limit tripped | Verify control wiring to heating circuit. Press thermal limit reset button inside junction box. If limit trips repeatedly, check for airflow restriction. |
| Unit does not activate with door interlock | Interlock wiring open; door contact misaligned | Test continuity across interlock terminals. Verify door contact gap is within specified range. Check 24V control power supply. |
| Excessive noise or vibration | Loose fastener; bearing wear; fan blade debris | Tighten all mounting hardware. Inspect fan blade for debris or imbalance. If bearing noise, contact Berner service — bearing replacement required. |
| BACnet device not discovered | IP address conflict; incorrect MS/TP baud rate; network segment mismatch | Verify device instance and IP settings per BACnet point list. Set MS/TP baud rate to match BAS. Confirm unit is on correct network segment. |
| Poor temperature separation at door | Unit undersized; incorrect mounting height; doors not fully closed when unit is off | Verify unit coverage matches door width. Review mounting height against performance table. Confirm door interlock is functioning. |
| Dust on air curtain | Dust accumulation on the front of the air curtain | If the air curtain has a filter, check that it is clean. |
Berner Technical Support. If the issue is not resolved by the steps above, call 1-800-245-4455. Have your serial number and description of the problem ready. Serial numbers can can be found on the bottom right corner of the air curtain.
Maintenance & Service Guidance
Regular maintenance extends service life, maintains energy performance, and prevents unplanned downtime. The schedule below covers standard commercial and industrial models. Heated units require additional attention to heating elements and thermal safety controls.
| Interval | Task |
|---|---|
| Monthly | Visual inspection. Confirm unit is secure, no vibration, discharge unobstructed |
| Quarterly | Clean inlet grille and discharge nozzle. Check and tighten mounting hardware. Check that the filters and air inlet are clean |
| Annually | Inspect blower wheels for wear or imbalance. Test door interlock and control functions. Clean heating element (heated units). Verify all electrical connections are tight. |
| As needed | Replace air filter (filtered models). Reset tripped thermal limits. Replace worn bearings or fan blades. |
Warranty & Service Records. Keep installation and maintenance records with the unit file. Proof of scheduled maintenance may be required for warranty claims. Service record forms are available in Product Manuals & Documentation.
Service Agreements
Berner can recommend qualified service contractors in your area. Contact Technical Support at 1-800-245-4455 or submit a service inquiry through Contact & Support.
Replacement Parts & Accessories
Berner replacement parts are available for all current and recent models. Use the model and serial number from the unit nameplate when ordering. Parts lists are included in the product installation manual.
Fan Assembly
Blower Wheel & Motor Assembly Match original OEM specification for motor and wheel assembly. Match original RPM and airflow specifications.
Heating Element
Electric Heating Element Drop-in replacement heating element for electric heated models. Available in multiple kW ratings.
Thermal Limit
Thermal Safety Cutout Factory-calibrated thermal limit replacement. Do not substitute with non-Berner approved parts.
Control Board
Variable Speed Drive / Control PCB Replacement control board for variable speed and BACnet-enabled models.
Air Filter
Inlet Air Filter (Filtered Models) Replacement filter media for models with inlet filtration. Replace quarterly or when visually dirty.
Mounting Kit
Bracket & Hardware Kit Complete mounting bracket set with hardware. Use when replacing or relocating an existing unit.
To order replacement parts...
Call 1.800.245.4455 with your model number and serial number, or submit a parts request through Technical Support. Parts for each model are available in Specifications & Documents.
Product Manuals & Documentation
Use the Specs, Docs. & Installation library to find the documentation for your Berner air curtain model:
- Installation & Operation Manuals
- Replacement Parts Lists
- BACnet Point Lists & Protocol Documents
- Data Sheets (includes Mechanical Drawings)
- CSI Specs & Product Submittals
Search by model number to find the correct manual for your unit. If you cannot locate your model, visit the Renamed and Discontinued Products page.
Need help?
Talk to a Berner Technical Specialist
Our technical team supports installation questions, troubleshooting, parts orders, and service inquiries. Call 1.800.245.4455 or submit a request online.